 Hyundai Accent: Interior Trim. Repair procedures
Replacement
Door Scuff Trim Replacement
| •
|
Put on gloves to protect your hands.
|
| •
|
When prying with a flat-tip screwdriver, wrap it with
protective tape to prevent damage.
|
| •
|
Take care not to bend or scratch the trim and panels.
|
|
|
1. |
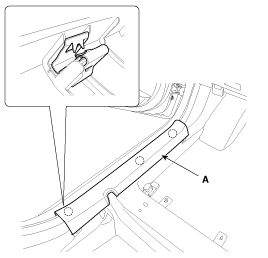
Using a screwdriver or remover, remove the front door scuff trim
(A).
[Front]
|
|
2. |
Remove the rear seat cushion.
(Refer to the BD group - "Rear Seat")
|
|
3. |
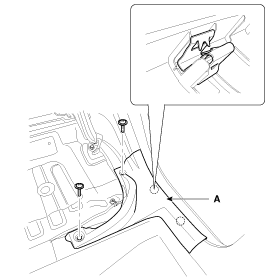
After loosening the mounting screws, then remove the rear door
scuff trim (A).
[Rear]
|
|
4. |
Installation is the reverse of removal.
|
• |
Replace any damage clips.
|
|
|
Door Scuff Trim Replacement
| •
|
Put on gloves to protect your hands.
|
| •
|
When prying with a flat-tip screwdriver, wrap it with
protective tape to prevent damage.
|
| •
|
Take care not to bend or scratch the trim and panels.
|
|
|
1. |
Using a screwdriver or remover, remove the front door scuff trim
(A).
[Front]
|
|
2. |
Remove the rear seat assembly.
(Refer to the BD group - "Rear Seat")
|
|
3. |
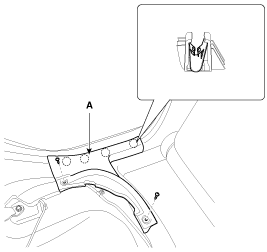
After loosening the mounting screw, then remove rear door scuff
trim (A).
[Rear]
|
|
4. |
Installation is the reverse of removal.
|
• |
Replace any damage clips.
|
|
|
Cowl Side Trim Replacement
| •
|
Put on gloves to protect your hands.
|
| •
|
Use a plastic panel removal tool to remove interior trim
pieces to protect from marring the surface
|
| •
|
Take care not to bend or scratch the trim and panels.
|
|
|
1. |
Remove the front door scuff trim.
|
|
2. |
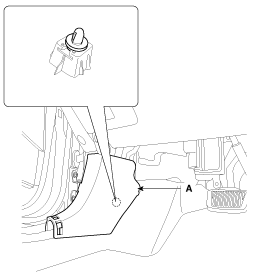
Using a screwdriver or remover, remove the cowl side trim (A).
|
|
3. |
Installation is the reverse of removal.
|
• |
Replace any damaged clips.
|
|
|
Front Pillar Trim Replacement
| •
|
Put on gloves to protect your hands.
|
| •
|
When prying with a flat-tip screwdriver, wrap it with
protective tape to prevent damage.
|
| •
|
Take care not to bend or scratch the trim and panels.
|
|
|
1. |
Using a screwdriver or remover, remove the front pillar trim (A).
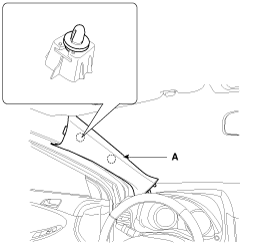
|
|
2. |
Installation is the reverse of removal.
|
• |
Replace any damaged clips.
|
|
|
Center Pillar Trim Replacement
| •
|
Put on gloves to protect your hands.
|
| •
|
When prying with a flat-tip screwdriver, wrap it with
protective tape to prevent damage.
|
| •
|
Take care not to bend or scratch the trim and panels.
|
|
|
1. |
Remove the front door scuff trim and rear door scuff trim.
|
|
2. |
Disconnect the battery negative cable, and wait for at least three
minutes before beginning work.
|
|
3. |
The seat belt anchor pretensioner (A) be removed after pushing
the lock pin (B) as arrow direction.
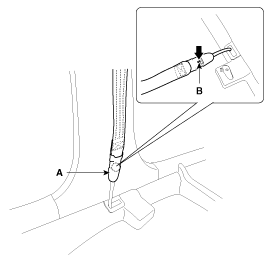
|
|
4. |
Using a screwdriver or remover, remove the center pillar lower
trim (A).
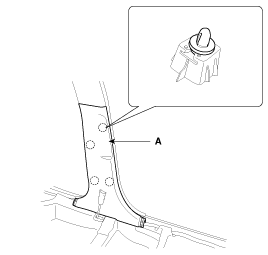
|
|
5. |
After loosening the mounting bolt, then remove the center pillar
upper trim (A).
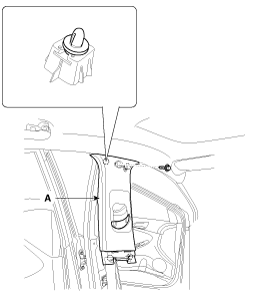
|
|
6. |
Installation is the reverse of removal.
|
• |
Replace any damaged clips.
|
|
|
Rear Pillar Trim Replacement
| •
|
Put on gloves to protect your hands.
|
| •
|
When prying with a flat-tip screwdriver, wrap it with
protective tape to prevent damage.
|
| •
|
Take care not to bend or scratch the trim and panels.
|
|
|
1. |
Using a screwdriver or remover, remove the rear pillar trim (A).

|
|
2. |
Installation is the reverse of removal.
|
• |
Replace any damaged clips.
|
|
|
Rear Pillar Trim Replacement
| •
|
Put on gloves to protect your hands.
|
| •
|
When prying with a flat-tip screwdriver, wrap it with
protective tape to prevent damage.
|
| •
|
Take care not to bend or scratch the trim and panels.
|
|
|
1. |
Remove the rear seat.
(Refer to the BD group – “Rear Seat�)
|
|
2. |
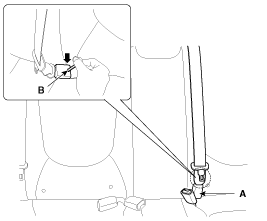
The rear center seat belt buckle (A) be removed after pushing
the lock pin (B) as arrow direction.
|
|
3. |
Remove the rear door scuff trim.
|
|
4. |
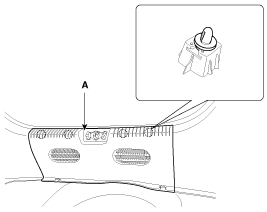
Detach the mounting clips, remove the transverse trim (A).
|
|
5. |
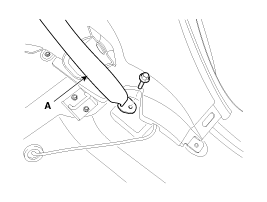
After loosening the mounting bolt, then remove the rear seat belt
lower anchor (A).
Tightening torque :
39.2 ~ 53.9 N.m (4.0 ~ 5.5 kgf.m, 28.9 ~ 39.8 lb-ft)
|
|
|
6. |
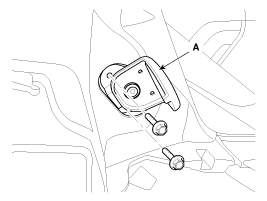
After loosening the mounting bolts, then remove the rear seat
bracket (A).
|
|
7. |
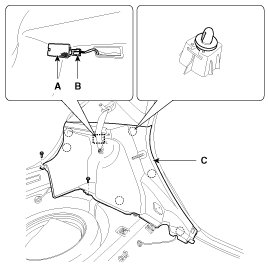
Using a screwdriver or remover, remove the lamp (A).
|
|
8. |
Disconnect the connector (B).
|
|
9. |
After loosening the mounting screws, then remove the luggage side
trim (C).
|
|
10. |
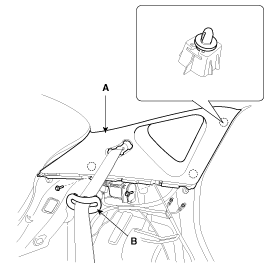
Remove the rear seat belt upper anchor cover (B).
|
|
11. |
After loosening the mounting bolts, then remove the rear pillar
trim (A).
|
|
12. |
Installation is the reverse of removal.
|
• |
Replace any damage clips.
|
|
|
Rear Wheelhousing Trim Replacement
| •
|
Put on gloves to protect your hands.
|
| •
|
When prying with a flat-tip screwdriver, wrap it with
protective tape to prevent damage.
|
| •
|
Take care not to bend or scratch the trim and panels.
|
|
|
1. |
Remove the rear seat.
(Refer to the BD group - "Rear Seat")
|
|
2. |
The rear center seat belt buckle (A) be removed after pushing
the lock pin (B) as arrow direction.
|
|
3. |
After loosening the mounting screws, then remove the rear door
scuff trim (A).
|
|
4. |
Using a screwdriver or remover, remove the rear pillar trim (A).
|
|
5. |
After loosening the mounting screws and clips, then remove the
luggage partition trim (A).

|
|
6. |
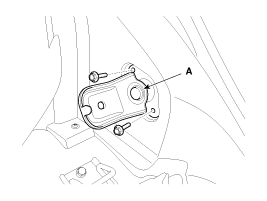
After loosening the mounting blots, then remove the rear seat
bracket (A).
|
|
7. |
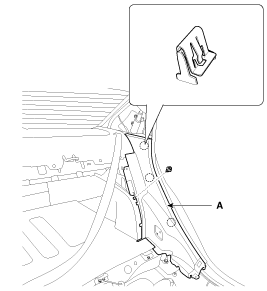
After loosening the mounting clip, then remove the rear wheelhousing
trim (A).
|
|
8. |
Installation is the reverse of removal.
|
• |
Replace any damaged clips.
|
|
|
Rear Package Tray Trim Replacement
| •
|
Put on gloves to protect your hands.
|
| •
|
When prying with a flat-tip screwdriver, wrap it with
protective tape to prevent damage.
|
| •
|
Take care not to bend or scratch the trim and panels.
|
|
|
1. |
Remove the rear seat.
(Refer to the BD group - "Rear Seat")
|
|
2. |
The rear center seat belt buckle (A) be removed after pushing
the lock pin (B) as arrow direction.
|
|
3. |
After loosening the mounting screws, then remove the rear door
scuff trim (A).
|
|
4. |
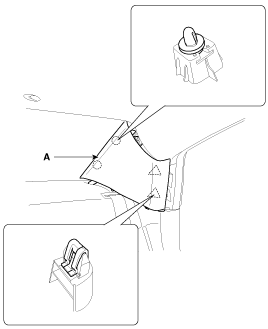
Using a screwdriver or remover, remove the rear pillar trim (A).
|
|
5. |
After loosening the mounting screws and clips, then remove the
luggage partition trim (A).
|
|
6. |
After loosening the mounting blots, then remove the rear seat
bracket (A).
|
|
7. |
After loosening the mounting clip, then remove the rear wheelhousing
trim (A).
|
|
8. |
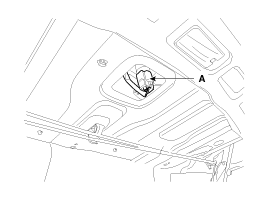
Disconnect the connector (A).
|
|
9. |
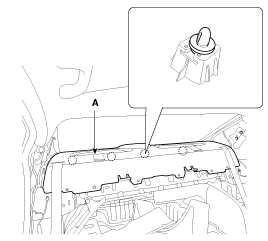
Remove the rear package tray trim (A).
|
|
10. |
Installation is the reverse of removal.
|
• |
Replace any damaged clips.
|
|
• |
Make sure the connector is connected properly.
|
|
|
Luggage Side Trim Replacement
| •
|
Put on gloves to protect your hands.
|
| •
|
When prying with a flat-tip screwdriver, wrap it with
protective tape to prevent damage.
|
| •
|
Take care not to bend or scratch the trim and panels.
|
|
|
1. |
Remove the rear seat.
(Refer to the BD group – “Rear Seat�)
|
|
2. |
Remove the rear door scuff trim.
|
|
3. |
Remove the transverse trim.
|
|
4. |
After loosening the mounting screws, then remove the luggage side
trim.
|
|
5. |
Installation is the reverse of removal.
|
• |
Replace any damage clips.
|
|
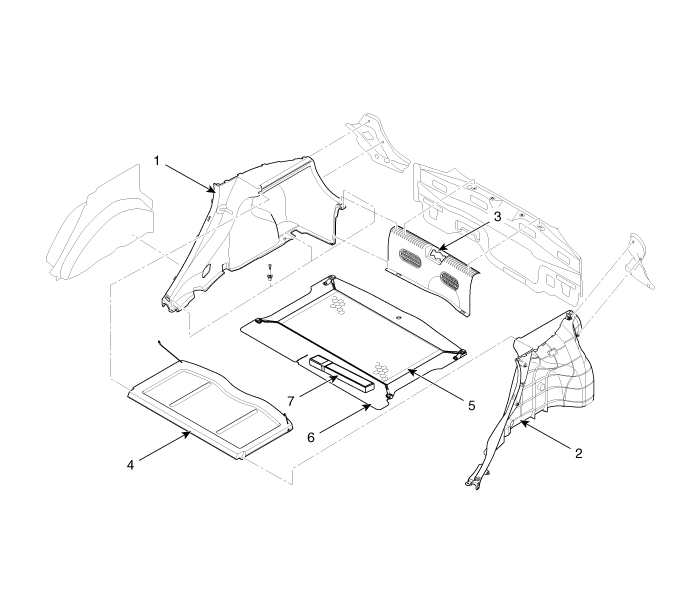
1. Luggage side trim [RH]
2. Luggage side trim [LH]
3. Transverse trim
4. Covering shelf trim
|
5. Luggage floor net
6. Luggage covering mat
7. Warning triangle
|
|
Components
1. Front pillar trim
2. Center pillar lower trim
3. Center pillar upper trim
4. Rear pillar trim [4 Door]
5. Rear wheelhousing trim
6. Front door scuf ...
Replacement
•
Put on gloves to protect your hands.
•
...
See also:
Hazard warning flasher
The hazard warning flasher serves as a warning to other drivers to exercise extreme
caution when approaching, overtaking, or passing your vehicle.
It should be used whenever emergency repairs are ...
Rear Disc Brake. Components and Components Location
Components
1. Guide rod bolt
2. Bleed screw
3. Caliper carrier
4. Caliper body
5. Brake pad
6. Pad retainer
...
Crash Pad. Components and Components
Location
Components
1. Main crash pad assembly
2. Side airvent duct [RH]
3. Side airvent duct [LH]
4. Cluster assembly
5. Cluster facia panel
6. Heater control unit
7. ...


 Interior Trim. Components and Components
Location
Interior Trim. Components and Components
Location Trunk Trim. Repair procedures