 Hyundai Accent: Rear seat
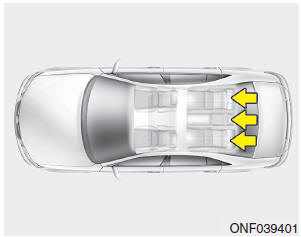
Headrest
The rear seat(s) is equipped with headrests in all the seating positions for the occupant's safety and comfort.
The headrest not only provides comfort for passengers, but also helps to protect the head and neck in the event of a collision.
![]() WARNING
WARNING
- For maximum effectiveness in case of an accident, the headrest should be adjusted so the middle of the headrest is at the same height of the center of gravity of an occupant's head. Generally, the center of gravity of most people's head is similar with the height of the top of their eyes. Also adjust the headrest as close to your head as possible. For this reason, the use of a cushion that holds the body away from the seatback is not recommended.
- Do not operate the vehicle with the headrests removed as severe injury to an occupant may occur in the event of an accident. Headrests may provide protection against severe neck injuries when properly adjusted.
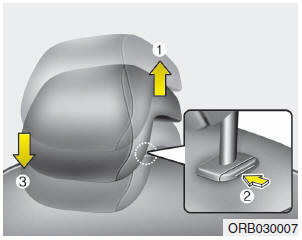
Adjusting the height up and down
To raise the headrest, pull it up (1). To lower the headrest, push and hold the release button (2) on the headrest support and lower the headrest (3).
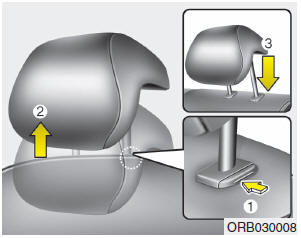
Adjusting the height up and down
To raise the headrest, pull it up (1). To lower the headrest, push and hold the release button (2) on the headrest support and lower the headrest (3).
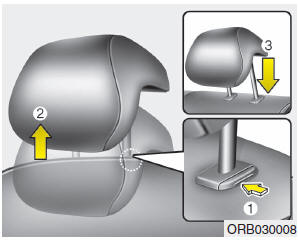
Removal
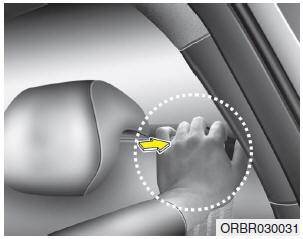
To remove the headrest, raise it as far as it can go then press the release button (1) while pulling upward (2).
To reinstall the headrest, put the headrest poles (3) into the holes while pressing the release button (1). Then adjust it to the appropriate height.
![]() WARNING
WARNING
Make sure the headrest locks in position after adjusting it to properly protect the occupants.
Folding the rear seat
The rear seatbacks can be folded to facilitate carrying long items or to increase the luggage capacity of the vehicle.
![]() WARNING
WARNING
The purpose of the fold-down rear seatbacks is to allow you to carry longer objects that could not be accommodated in the cargo area.
Never allow passengers to sit on top of the folded down seatback while the vehicle is moving. This is not a proper seating position and no seat belts are available for use.
This could result in serious injury or death in case of an accident or sudden stop. Objects carried on the folded down seatback should not extend higher than the top of the front seatbacks. Doing this could allow cargo to slide forward and cause injury or damage during sudden stops.
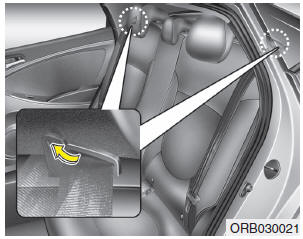
To fold down the rear seatback:
1. Make sure the rear seat belt webbing is in the guide to prevent the seat belt
from being damaged.
2. Set the front seatback to the upright position and if necessary, slide the front
seat forward.
3. Lower the rear headrests to the lowest position.
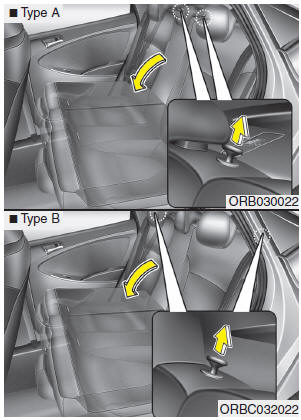
4.Pull on the seatback folding lever, then fold the seat toward the front of the vehicle.
5. To use the rear seat, lift and pull the seatback backward. Push the seatback
firmly until it clicks into place. Make sure the seatback is locked in place. When
you return the seatback to its upright position, always be sure it has locked into
position by pushing on the top of the seatback.
6. Return the rear seat belt to the proper position.
![]() NOTICE
NOTICE
If you are not able to pull out the seat belt from the retractor, after returning the seatback to the upright position, press the seatbelt and seatback at the same time. Then pull the belt out. You will be able to pull the belt out smoothly.
![]() WARNING
WARNING
When you return the rear seatback to its upright position after being folded down:
Be careful not to damage the seat belt webbing or buckle. Do not allow the seat belt webbing or buckle to get caught or pinched in the rear seat. Ensure that the seatback is completely locked into its upright position by pushing on the top of the seatback. Otherwise, in an accident or sudden stop, the seat could fold down and allow cargo to enter the passenger compartment, which could result in serious injury or death.
CAUTION - Damaging rear seat belt buckles
When folding the rear seatback, insert the buckle in the pocket between the rear seatback and cushion. Doing so can prevent the buckle from being damaged by the rear seatback.
CAUTION - Rear seat belts
When returning the rear seatbacks to the upright position, remember to return the rear shoulder belts to their proper position. Routing the seat belt webbing through the rear seat belt guides will help keep the seat belts from being trapped behind or under the seats.
WARNING - Cargo
Cargo should always be secured to prevent it from being thrown about the vehicle in a collision and causing injury to the vehicle occupants. Do not place objects in the rear seats, since they cannot be properly secured and may hit the front seat occupants in a collision.
WARNING - Cargo loading
Make sure the engine is off, the automatic transaxle is in P (Park) or the manual transaxle is in R (Reverse) or 1st, and the parking brake is securely applied whenever loading or unloading cargo. Failure to take these steps may allow the vehicle to move if the shift lever is inadvertently moved to another position.
 Front seat
Manual adjustment
Forward and rearward
To move the seat forward or rearward:
1. Pull the seat slide adjustment lever up and hold it.
2. Slide the seat to the position you desire.
3. Release the ...
 Seat belts
...
See also:
Removal
1.
Loosen the windshield wiper arm nut (A) after removing a wiper
cap (B).
2.
Remove the windshield wiper arm and blade.
...
Wipers and washers
A :Wiper speed control
· MIST – Single wipe
· OFF – Off
· INT – Intermittent wipe
· LO – Low wiper speed
· HI – High wiper speed
B : Intermittent wipe time adjustment
C :Wash w ...
Towing
If the vehicle needs to be towed, call a professional towing
service. Never tow vehicle with just a rope or chain. It is very dangerous.
...
