 Hyundai Accent: Replacement
The injector combustion seal should be replaced new one to
prevent leakage after removing the injector.
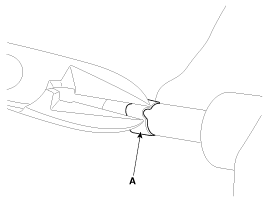
| 1. |
Remove the combustion seal (A) with a wire cutter.
|
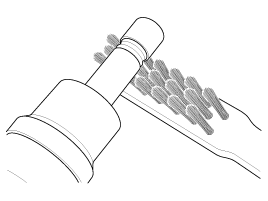
| 2. |
Before the assembly of the sealing ring the groove
must be cleaned using a clean cloth.
Any coking of the injector sealing surface must be
carefully removed with a brass-wire brush.
|
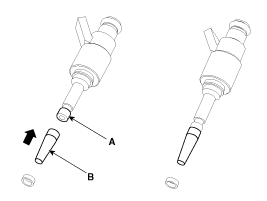
| 3. |
Place the seal installing guide (B) (SST No.: 09353-2B000)
on the tip of the injector not to damage the injector tip (A).
Push the sealing ring (C) with thumb and index finger
over the conical assembly tool until it snaps into the groove.
The complete assembly must not take longer than 2
to 3 seconds.
|
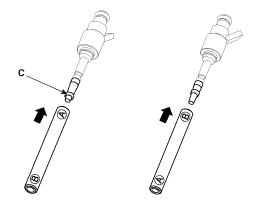
| 4. |
To size the sealing ring the injector is first introduced
into the sizing tool (A) (SST No.: 09353-2B000) and then pressed and
at the same time rotated 180° into the sizing tool.
|
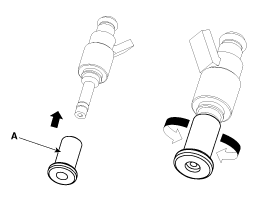
| 5. |
Pull the injector out of the sizing tool by turning
it in the reverse direction to that used for the press-in process.
|
| 6. |
Check the combustion seal (A) installation.
|
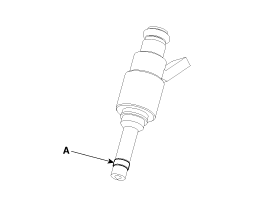
 Installation
1.
Combustion seal
2.
Rubber washer
3.
Support disc
4.
O-ring
...
 Purge Control Solenoid
Valve (PCSV). Description and Operation
Purge Control Solenoid
Valve (PCSV). Description and Operation
Description
Purge Control Solenoid Valve (PCSV) is installed on the surge
tank and controls the passage between the canister and the intake manifold.
It is a solenoid valve and is open when ...
See also:
Reassembly
•
Thoroughly clean all parts to be assembled.
•
...
Replacement
1.
Remove the front wheel & tire.
Tightening torque :
88.3 ~ 107.9N.m(9.0 ~ 11.0kgf.m, 65.1 ~ 79.6lb-ft)
...
Parking brake
Applying the parking brake
To engage the parking brake, first apply the foot brake and then pull up the
parking brake lever as far as possible without pressing the release button.
In addition it ...
Hyundai Accent Manuals

© 2011-2026 Copyright www.hamanual.com