 Hyundai Accent: Roof Trim. Repair procedures
Replacement
Sunvisor Replacement
| •
|
When prying with a flat-tip screwdriver, wrap it with
protective tape to prevent damage.
|
| •
|
Put on gloves to protect your hands.
|
|
|
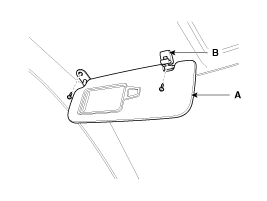
1. |
After loosening the mounting screws, then remove the sunvisor
(A) and retainer (B).
|
|
2. |
Installation is the reverse of removal.
|
Assist Handle Replacement
| •
|
When prying with a flat-tip screwdriver, wrap it with
protective tape to prevent damage.
|
| •
|
Put on gloves to protect your hands.
|
|
|
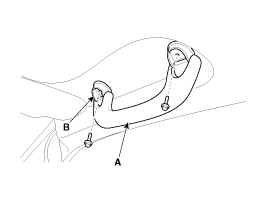
2. |
After loosening the mounting bolts, then remove the assist handle
(A).
|
|
3. |
Installation is the reverse of removal.
|
Overhead Console Replacement
| •
|
When prying with a flat-tip screwdriver, wrap it with
protective tape to prevent damage.
|
| •
|
Put on gloves to protect your hands.
|
|
|
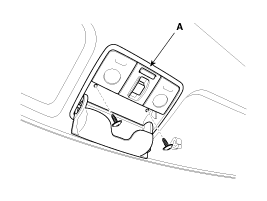
1. |
After loosening the mounting screws, then remove the overhead
console assembly (A).
|
|
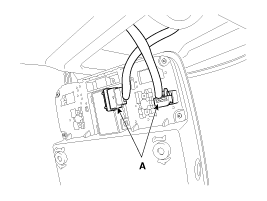
2. |
Disconnect the connectors (A).
|
|
3. |
Installation is the reverse of removal.
|
• |
Make sure the connector is connected properly.
|
|
|
Roof Trim Replacement
| •
|
When prying with a flat-tip screwdriver, wrap it with
protective tape, and apply protective tape around the related
parts, to prevent damage.
|
| •
|
Put on gloves to protect your hands.
|
|
|
1. |
Remove the following items.
| A. |
Front seat
(Refer to the BD group - "Front Seat")
|
| B. |
Rear seat
(Refer to the BD group - "Rear Seat")
|
| F. |
Front pillar trim
(Refer to the BD group - " Interior Trim")
|
| G. |
Front door scuff trim & Rear door scuff trim
(Refer to the BD group - " Interior Trim")
|
| H. |
Center pillar lower trim & Center pillar upper trim
(Refer to the BD group - " Interior Trim")
|
| I. |
Rear pillar trim
(Refer to the BD group - " Interior Trim")
|
| J. |
Rear wheelhousing trim
(Refer to the BD group - " Interior Trim")
|
| K. |
Floor console
(Refer to the BD group - "Console")
|
|
|
2. |
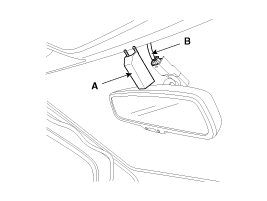
Remove the ECM mirror cover (A).
|
|
3. |
Disconnect the ECM mirror connector (B).
|
|
4. |
Disconnect the connectors (A) and then mounting clips in front
pillar.
[ Driver's ]
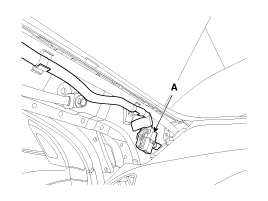
[ Passenger's ]
|
|
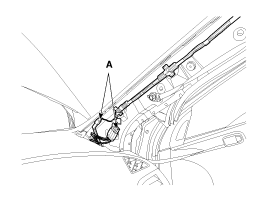
5. |
Remove the clips and roof trim (A).
|
|
6. |
Installation is the reverse of removal.
|
• |
Replace any damage clips.
|
|
|
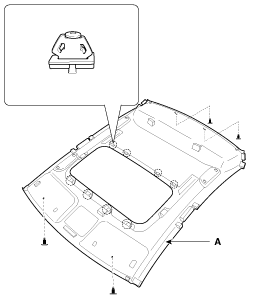
[5 Door]
1. Roof trim
2. Retainer
3. Sunvisor
4. Assist handle
5. Assist handle bracket
...
Components
1. Front pillar trim
2. Center pillar lower trim
3. Center pillar upper trim
4. Rear pillar trim [4 Door]
5. Rear wheelhousing trim
6. Front door scuf ...
See also:
Pre-tensioner seat belt
Your vehicle is equipped with driver's and front passenger's pre-tensioner seat
belts. The purpose of the pre-tensioner is to make sure that the seat belts fit
tightly against the occupa ...
Removal
Pressure Side Impact Sensor
•
Removal of the airbag must be performed according to the ...
Rear Seat. Components and
Components Location
Components
1. Headrest [RH]
2. Rear seat back cover [RH]
3. Rear seat back frame assembly [RH]
4. Rear back cover [RH]
5. Headrest [Center]
6. Headrest [LH]
7 ...
 Components(2)
 Interior Trim. Components and Components
Location
Interior Trim. Components and Components
Location