 Hyundai Accent: Roof Trim. Repair procedures
Replacement
Sunvisor Replacement
| •
|
When prying with a flat-tip screwdriver, wrap it with
protective tape to prevent damage.
|
| •
|
Put on gloves to protect your hands.
|
|
|
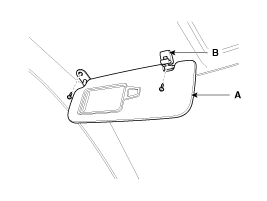
1. |
After loosening the mounting screws, then remove the sunvisor
(A) and retainer (B).
|
|
2. |
Installation is the reverse of removal.
|
Assist Handle Replacement
| •
|
When prying with a flat-tip screwdriver, wrap it with
protective tape to prevent damage.
|
| •
|
Put on gloves to protect your hands.
|
|
|
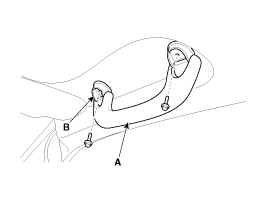
2. |
After loosening the mounting bolts, then remove the assist handle
(A).
|
|
3. |
Installation is the reverse of removal.
|
Overhead Console Replacement
| •
|
When prying with a flat-tip screwdriver, wrap it with
protective tape to prevent damage.
|
| •
|
Put on gloves to protect your hands.
|
|
|
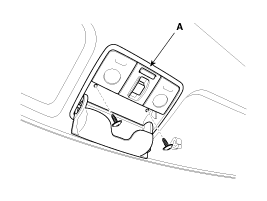
1. |
After loosening the mounting screws, then remove the overhead
console assembly (A).
|
|
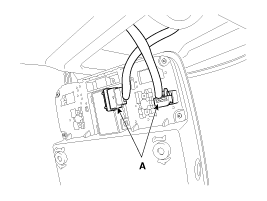
2. |
Disconnect the connectors (A).
|
|
3. |
Installation is the reverse of removal.
|
• |
Make sure the connector is connected properly.
|
|
|
Roof Trim Replacement
| •
|
When prying with a flat-tip screwdriver, wrap it with
protective tape, and apply protective tape around the related
parts, to prevent damage.
|
| •
|
Put on gloves to protect your hands.
|
|
|
1. |
Remove the following items.
| A. |
Front seat
(Refer to the BD group - "Front Seat")
|
| B. |
Rear seat
(Refer to the BD group - "Rear Seat")
|
| F. |
Front pillar trim
(Refer to the BD group - " Interior Trim")
|
| G. |
Front door scuff trim & Rear door scuff trim
(Refer to the BD group - " Interior Trim")
|
| H. |
Center pillar lower trim & Center pillar upper trim
(Refer to the BD group - " Interior Trim")
|
| I. |
Rear pillar trim
(Refer to the BD group - " Interior Trim")
|
| J. |
Rear wheelhousing trim
(Refer to the BD group - " Interior Trim")
|
| K. |
Floor console
(Refer to the BD group - "Console")
|
|
|
2. |
Remove the ECM mirror cover (A).
|
|
3. |
Disconnect the ECM mirror connector (B).
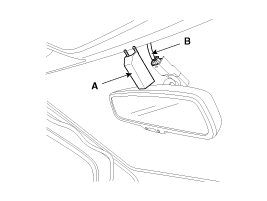
|
|
4. |
Disconnect the connectors (A) and then mounting clips in front
pillar.
[ Driver's ]
[ Passenger's ]
|
|
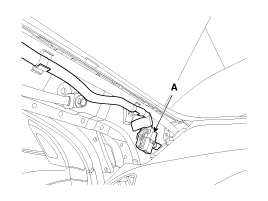
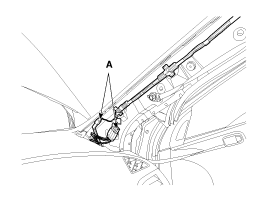
5. |
Remove the clips and roof trim (A).
|
|
6. |
Installation is the reverse of removal.
|
• |
Replace any damage clips.
|
|
|
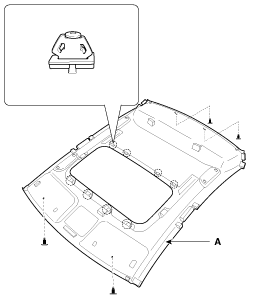
[5 Door]
1. Roof trim
2. Retainer
3. Sunvisor
4. Assist handle
5. Assist handle bracket
...
Components
1. Front pillar trim
2. Center pillar lower trim
3. Center pillar upper trim
4. Rear pillar trim [4 Door]
5. Rear wheelhousing trim
6. Front door scuf ...
See also:
Removal
1.
Remove valve core and deflate the tire.
2.
Remove the side of the tire bead area from the wheel using tire
changing machine .
...
Defroster
CAUTION
To prevent damage to the conductors bonded to the inside surface of the
rear window, never use sharp instruments or window cleaners containing abrasives
to clean the window.
NOTICE
If ...
Thermostat. Troubleshooting
Troubleshooting
Symptoms
Possible Causes
Remedy
Coolant leakage
•
From the thermostat gasket
...
 Components(2)
 Interior Trim. Components and Components
Location
Interior Trim. Components and Components
Location