 Hyundai Accent: Windshield Glass. Repair procedures
Hyundai Accent RB (2010-2018) Service Manual / Body (Interior and Exterior) / Interior / Windshield Glass. Repair procedures
Replacement
| Removal |
|
| 1. |
Remove the following items.
|
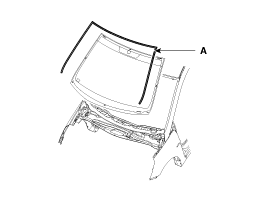
| 2. |
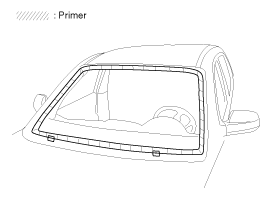
Using a screwdriver or remover, remove the windshield molding
(A).
|
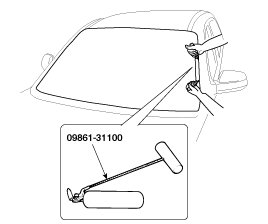
| 3. |
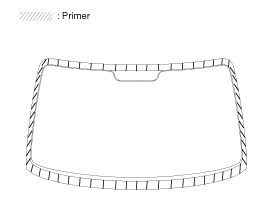
Cut out the sealant using the sealant cutting tool (09861-31100).
|
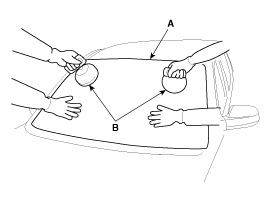
| 4. |
Remove the windshield glass (A) carefully using the glass holder
(B).
|
| Installtion |
| 1. |
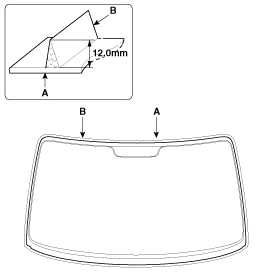
With a knife, scrape the old adhesive smooth to a thickness of
about 2mm (0.08 in.) on the bonding surface around the entire windshield
opening flange:
|
| 2. |
Clean the bonding surface with a sponge dampened in alcohol. After
cleaning, keep oil, grease and water from getting on the clean surface.
|
| 3. |
Install the windshield molding (A) and fasteners. Do not allow
any gaps.
|
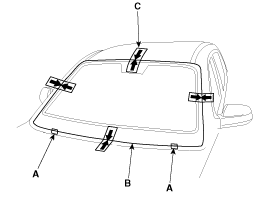
| 4. |
Install the spacer (A) install the windshield glass (B) temporarily
with marking sure to position them on the center, and then place the
alignment mark (C).
|
| 5. |
With a sponge, apply a light coat of body primer to the original
adhesive remaining around the windshield opening flange. Let the body
primer dry for at least 10 minutes.
|
| 6. |
Apply a light coat of glass primer to the outside of the fasteners.
|
| 7. |
Pack adhesive into the cartridge without air pockets to ensure
continuous delivery. Put the cartridge in a caulking gun, and run a
bead of adhesive (B) around the edge of the windshield glass (A) between
the fastener and molding as shown. Apply the adhesive within 30 minutes
after applying the glass primer.
Make a slightly thicker bead at each corner.
|
| 8. |
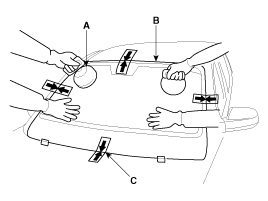
Use suction cups (A) to hold the windshield ( B) over the opening,
align it with the alignment marks (C) made in step 15, and set it down
on the adhesive. Lightly push on the windshield until its edges are
fully seated on the adhesive all the way around. Do not open or close
the doors until the adhesive is dry.
|
| 9. |
Scrape or wipe the excess adhesive off with a putty knife or towel.
To remove adhesive from a painted surface or the windshield, wipe with
a soft shop towel dampened with alcohol.
|
| 10. |
Let the adhesive dry for at least one hour, then spray water over
the windshield and check for leaks. Make leaking areas, and let the
windshield dry, then seal with sealant:
|
| 11. |
Reinstall all remaining removed parts. Install the rearview mirror
after the adhesive has dried thoroughly. Advise the customer not to
do the following things for two the three days:
|
| 12. |
Installation the following items.
|
 Windshield Glass. Components and
Components Location
Windshield Glass. Components and
Components Location
Components
1. Windshield glass molding
2. Windshield glass
...
 Bumper
...
See also:
Installation
1.
Dowel pin of crankshaft should be positioned at 3°
in relation to vertical center line.
2.
Align the TDC marks (A) of the CVVT ...
Smooth cornering
Avoid braking or gear changing in corners, especially when roads are wet. Ideally,
corners should always be taken under gentle acceleration. If you follow these suggestions,
tire wear will be he ...
Driving in flooded areas
Avoid driving through flooded areas unless you are sure the water is no higher
than the bottom of the wheel hub. Drive through any water slowly. Allow adequate
stopping distance because brake perf ...
Hyundai Accent Manuals

© 2011-2026 Copyright www.hamanual.com