 Hyundai Accent: Body Side Moldings. Repair procedures
Replacement
Trunk Lid Garnish Replacement
| •
|
When prying with a flat-tip screwdriver, wrap it with
protective tape, and apply protective tape around the related
parts, to prevent damaged.
|
| •
|
Put on gloves to protect your hands.
|
| •
|
Take care not to scratch the body surface.
|
|
|
1. |
Remove the trunk lid trim.
(Refer to the BD group - "Trunk Lid")
|
|
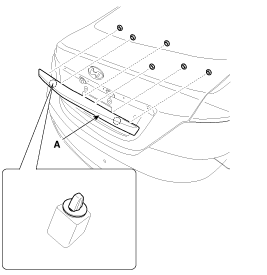
2. |
After loosening the mounting nuts, then remove the trunk lid garnish
(A).
|
|
3. |
Installation is the reverse of removal.
|
Rear Spoiler Replacement
| •
|
When prying with a flat-tip screwdriver, wrap it with
protective tape, and apply protective tape around the related
parts, to prevent damaged.
|
| •
|
Put on gloves to protect your hands.
|
| •
|
Take care not to scratch the body surface.
|
|
|
1. |
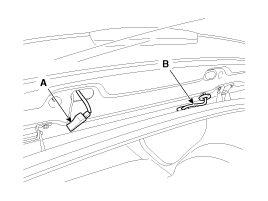
Disconnect the rear spoiler connector (A) and washer nozzle (B).
|
|
2. |
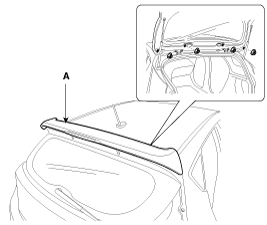
After loosening the mounting nuts, then remove the rear spoiler
(A).
|
|
3. |
Installation is the reverse of removal.
|
• |
Replace any damage clips.
|
|
|
Roof Molding Replacement
| •
|
When prying with a flat-tip screwdriver, wrap it with
protective tape, and apply protective tape around the related
parts, to prevent damaged.
|
| •
|
Put on gloves to protect your hands.
|
| •
|
Take care not to scratch the body surface.
|
|
|
1. |
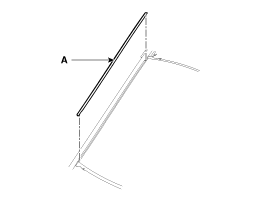
Using a screwdriver or remover, remove the roof molding (A).
|
|
2. |
Installation is the reverse of removal.
|
• |
Put on gloves to protect your hands.
|
|
• |
Replace any damage clips.
|
|
|
Delta Garnish Replacement
| •
|
When prying with a flat-tip screwdriver, wrap it with
protective tape, and apply protective tape around the related
parts, to prevent damaged.
|
| •
|
Put on gloves to protect your hands.
|
| •
|
Take care not to scratch the body surface.
|
|
|
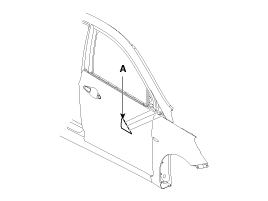
1. |
Using a screwdriver or remover, remove the delta garnish (A).
|
|
2. |
Installation is the reverse of removal.
|
• |
Replace any damage clips.
|
|
|
Quarter Garnish Replacement
| •
|
When prying with a flat-tip screwdriver, wrap it with
protective tape, and apply protective tape around the related
parts, to prevent damaged.
|
| •
|
Put on gloves to protect your hands.
|
| •
|
Take care not to scratch the body surface.
|
|
|
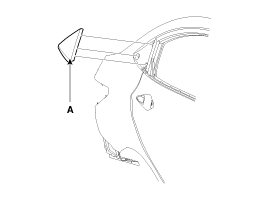
1. |
Using a screwdriver or remover, remove the quarter garnish (A).
|
|
2. |
Installation is the reverse of removal.
|
• |
Replace any damage clips.
|
|
|
Front Wheel Guard Replacement
| •
|
When prying with a flat-tip screwdriver, wrap it with
protective tape, and apply protective tape around the related
parts, to prevent damaged.
|
| •
|
Put on gloves to protect your hands.
|
| •
|
Take care not to scratch the body surface.
|
|
|
2. |
After loosening the mounting screws and nuts, then remove the
front wheel guard (A).
[LH]
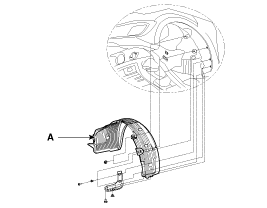
[RH]
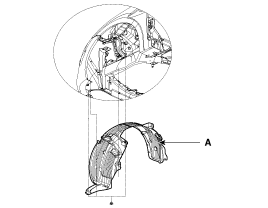
|
|
3. |
Installation is the reverse of removal.
|
• |
Replace any damage clips.
|
|
|
Rear Wheel Guard and Mud Guard Replacement
| •
|
When prying with a flat-tip screwdriver, wrap it with
protective tape, and apply protective tape around the related
parts, to prevent damaged.
|
| •
|
Put on gloves to protect your hands.
|
| •
|
Take care not to scratch the body surface.
|
|
|
2. |
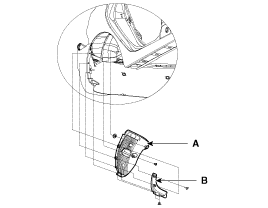
After loosening the mounting screws and nuts, then remove the
rear wheel guard (A) and mud guard (B).
|
|
3. |
Installation is the reverse of removal.
|
• |
Replace any damage clips.
|
|
|
Deflector Guard Replacement
| •
|
When prying with a flat-tip screwdriver, wrap it with
protective tape, and apply protective tape around the related
parts, to prevent damaged.
|
| •
|
Put on gloves to protect your hands.
|
| •
|
Take care not to scratch the body surface.
|
|
|
2. |
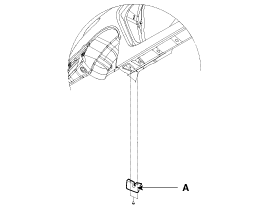
After loosening the mounting screws, then remove the deflecotor
guard (A).
|
|
3. |
Installation is the reverse of removal.
|
• |
Replace any damage clips.
|
|
|
Glass Adjustment
•
Check the glass run channel for damage or deterioration,
and replace ...
Components
1. Sunroof frame assembly
2. Motor assembly
3. Glass assembly
4. Guide assembly
5. Drip rail assembly
6. Drip link
7. Sunshade assembly
8. Defle ...
See also:
Injector. Description
and Operation
Description
Based on information from various sensors, the ECM can calculate
the fuel amount to be injected. The fuel injector is a solenoid-operated valve
and the fuel injection amount is c ...
Components and Components Location
Components
1. Hands free call switch
2. Mic
3. Front left speaker
4. Front right speaker
5. Audio head unit (hands free control)
※ There is ...
Knock Sensor (KS). Description
and Operation
Description
Knocking is a phenomenon characterized by undesirable vibration
and noise and can cause engine damage. Knock Sensor (KS) is installed on the
cylinder block and senses engine knoc ...


 Adjustment
 Sunroof. Components and Components
Location
Sunroof. Components and Components
Location